Showing posts with label bias binding. Show all posts

Friday, April 14, 2023

Let's Make and Wear a Kaftan


This post may contain affiliate links. This means that if you click through and make a purchase from these links, I may earn a small commission at no extra cost to you.

This was a fun make! I love the ease of making it, but I love wearing it as well!


I did a sew along on TIKTok (yep, I said TikTok) with a talented group of sewist and designers!  That made it even more fun! The talent is certainly there, but the hilarity often takes over - and I love it!! 
So much love, laughter and serious sewing!
The group is @blacksewing network. It was created by Carmen who has 2 handles:
@cagthemag on TT and @CAGReinvented Blog on FaceBook.

The patterns that were used are Simplicity 8877 and Simplicity 8911

They both required a good bit of fabric and because I'm still on a fabric fast - I couldn't find a piece from my stash that was long enough - soooo - I self-drafted a pattern that only has 2 pieces and used less fabric. That piece was not quite long enough to make it floor length.  So I decided to make it a bit shorter in the front and floor length in the back! 
I decided to use packaged bias binding for the neckline. 

Us creatives will always find a way to make it work!

The fabric is a drapey mystery poly blend snake print with a sprinkling of silver flecks.

I haven't decided if I will wear it outside, but I'll  definitely be swishing around the house in it!
It is SEW comfy!


Monday, November 30, 2020

Floral Cardigan

This Madison Cardigan pattern by @stylesewme has been on my to do list for much too long! 

I purchased the pattern when it was 1st published, but just could not find the perfect fabric. Then...Minerva sent me this glorious Ponte Roma knit with this beautiful print and I knew it was going to be this pattern! 


I found the fabric and pattern easy to work with. I cut a size XL and did not need to make any atlerations! 

The instructions stressed stay-stitching the back neckline, but I used the technique that I use on most knits. I applied fusible knit tape on the back neckline as well as the shoulders. I then sergeged the neckline.

A narrow hem was also used in the instructions, but because the wrong side of the fabric is black, I decided that I didn't want to see the print on the wrong side. So I opted for purchased bias binding. And I'm very happy with the outcome! 

I tried it on twice...before and after I added the binding. I have to tell you that I was in love with the fit, but even more so with the drape of this garment!
I loved it so much that I did not want to take it off after either try on! It is even more lovely that I thought it would be...both the fabric and the pattern design! 

It was quite a windy day when I took the photos, but I think they work! 

Would I make it again? Definitely! 


Monday, October 28, 2019

The Floral Challenge

This post may contain affiliate links. This means that if you click through and make a purchase from these links, I may earn a small commission at no extra cost to you.

This jacket tried to take me out...but I persevered and won!


Thus the title: "The Floral Challenge" 


Remember, fabric is an inanimate object, you are in control! 
After all the challenges, I am in love with it!  
I will definitely make it again and again!


I'm also entering it in a jacket/coat sewing challenge in the @sewmuchtalent group!
I used Simplicity 1421 and only made my normal sleeve length (too long) and waist (increased by 1.5 inches) adjustments.  
I was sew happy about that!


I love how the shiny silver buttons stand out!


 Gotta have that pop of color, even it's on the inside!


The floral print was purchased 2 years ago from Joann's. I knew I'd eventually use it to make a jacket - I just needed to decide which jacket!  

Challenge # 1 - Time! 
I had to put this jacket down several times over the summer, due to working on custom  garments.

Challenge # 2 - The fabric was much lighter in weight than I thought. 
So to give it some weight, I had to block interface it with Pellon EK130 - after I pre-washed it. 

The quilted look faux leather has some stretch to it.  I was a Joann Fabrics 2 yard remnant that I paid $6.00 for.  When I purchased it, I had no idea what I would with it...maybe a bag...I just liked it!


Challenge # 3 - Once I decided to use Simplicity 1421 (which had been in my pattern stash longer than the fabric) I checked to make sure I had enough of the faux leather for sleeves...I didn't!  But, the pattern has 2 piece sleeves and that excited me.  I had enough for the upper sleeves and the pockets!  I was in love!


Challenge # 4 - How would I do the finishing?


No lining, but interfaced.  Of course I could have created a lining, but I chose not to.  Instead, I chose to do bound seams. I love brightly colored linings, sew of course I needed some color inside all of that black. I love the teal bias tape.  I also used a teal print inside the pockets! 😃


Challenge # 5 - Broken needles! 
The jacket and facings went together without any problems.

Making the 2 piece sleeves was easy and fast! 

But inserting the sleeves was a challenge.  There were so many layers - sleeve seams, jacket seams, binding on both! At some points, I think there were 6 to 8 layers of fabric to sew through,  But I chose not to use a denim needle, because I did not want to take the chance on creating large pin holes in the faux leather. So, I ended up breaking needles on each sleeve. But I got them in!  It's all inanimate and I was in control!  LOL!


Challenge # 6 - Buttonholes!
I love all the buttonhole choices I have on my Juki F600, but it did not cooperate that day! 

After changing tensions, using all the tricks I could think of and picking out 3 different types of buttonholes - I finally switched to the Brother machine that I use for classes to make them! It was effortless, but I'd stitched them in the wrong place!  😂

One more game of unpicking, remarking and re-stitching...I had perfect buttonholes!

I always use fray check on both side of my buttonholes before I cut them.


You can tell from the indentation on my little buttonhole mat that I use this cutting set quite often! 


Challenge # 7 - To Top-stitch or not to top-stitch!


Ok...that was not really a challenge, but a decision. I was pretty sure it would look great on the jacket itself, but I did not want to distort the sleeve hems by top-stitching them. In the end, I top-stitched the jacket, but left the sleeves un-stitched.


Challenge # 8 - Buttons!  Yes, buttons.
I posted the partially finished jacket in my group and asked for their opinion. I was thinking black or white. One of the group members suggested buttons with black and silver.  I ended up buying white buttons and black and silver buttons, but took all of them back and exchanged them for silver buttons! I love how they look against the print and the faux leather!


I then finished all the hems by hands and added the buttons. I held the sleeve hems in place with clips...no pins in the faux leather!

Because of the faux leather and layers, I used my Thimble Crown! I love this little tool!  No sore fingers and fits better than thimbles!


I don't like hand stitching, but I'm very happy with the hems!


Tada! I'ts finished!  I can't wait to wear it! I will definitely make this jacket again! 


Are you making coats, jackets, dusters or capes this season! Why? Why not? 
Feel free to leave your responses in the comments!

Happy Endless Sewing!


Don't want to miss a blog post? Sign up for email notices.


Saturday, December 29, 2018

Make Nine 2018 Challenge - I did it!

This post may contain affiliate links. This means that if you click through and make a purchase from these links, I may earn a small commission at no extra cost to you.

The addiction continues! Another challenge completed!  
No surprise, right! 😄

The great thing about this challenge is that we were able to pre-select which pieces we'd make...and change our minds along the way! So I was able to make garments that I'd actually wear! 
This made it even more fun than some of the other challenges I've participated in! 


I will be scaling back on the number of challenges that I participate in for 2019.  This one will remain on my list. Although most are meant to help improve our sewing and tailoring skills, some are just not practical garments for my body type or lifestyle. 


 The pics are not posted in
any particular sewing or completion order!  
I hope you enjoying reading about them!

                                                                      Butterick 6248

This beautiful print was made late one night.  I'd purchased this ITY knit from Vogue Fabrics in 2017.  I enjoyed the challenge of matching the print.  And that godet in the back is just fun!  
My only hacks were to lengthen the front and to make the sleeves 3/4 length.


Simplicity 8377

This acid wash rayon mix fabric drove me a little bit crazy!  I spotted it in Joann's but was never able to find enough to make the duster I knew it was meant for!  When I finally spotted a bolt with enough fabric for a duster, I bought what was left on the bolt! Although is it not denim, it was sold with the denim fabrics, so I bought it when the denim fabric was on sale!  
I hacked it by altering the sleeves and added black bias binding!  Can't wait till spring or summer when I can wear it again!


McCalls 7542

This was made due to a bit of jealously!  LOL!
I'd made so many pieces for other people with this Kente print fabric that I decided it was time to use it to make something for myself! 
The fabric was purchased from LLD720 African Fabrics


Simplicity 1108

Sew, sew fun to make and wear!  This border print had been in my stash for several years.
I really enjoyed working on the placement of the print! 
The semi-circular band posed somewhat of a problem for my brain, but I just slowed down and carefully followed the instructions and paid attention to how it was attached in the photos.  
Although I wasn't sure how the print placement would work, I was more than thrilled with the final outcome!


McCall's 7622

This dress was made as part of a challenge!  I was inspired by a great sewist and blogger: Linda Fay Lewis.  I added cold  shoulders and changed the sleeves to bell sleeves.  I've since shortened it by a few inches - and I'm even happier with it!
The black and white sheer duster I am wearing with is a self-drafted pattern!  Check here to read my blog post about it!


Vogue 9275

This one took a while to complete! The fabric is a quilted knit with gold thread.  I purchased it from Joann's at the beginning of the year, but had no idea what I would make.  Then I found a 2 yard remnant at Vogue Fabrics. It's a brown knit with...you guessed it - gold thread!  Then, boom!  The idea hit me!  A Long Bomber Jacket - with a gold satin lining from from my stash!  My only hack was to use a shorter zipper than the pattern suggested.  It took longer than usual because my sewing machine had to be repaired and I was just not willing to trust my back up machines to complete the top-stitching...knit and satin...oh my!
Sew, I waited until my machine was repaired, but by then I was involved in other projects...one being my Online Sewing Classes!  There is always time to register for stand alone classes or my membership program!


Butterick 5954

Sew!
Sometimes I sew for trips I'm taking!  Ok...I sew for most trips I take!
  No idea why I that, but I do!
LOL!
I made this black top with stretch crepe to wear at the Houston International Quilt Fest in November where I had the honor and pleasure of working with Reen Wilcoxson of Embroidery Garden.
This fabric is a glorious fabric to work with and wear and it travels well!  It has great drape and great recovery.  I noticed that another sewist added buttons to prevent the front flap from flying open and revealing her "secrets".  So I opted to do the same thing.  I found the cute heart shaped buttons at Joann's.  I'm glad I added the buttons - it made it even more comfy to wear!
I love the hi/low effect! I can see wearing it with a pencil skirt!


Simplicity 8529

This was such a quick make that I've made 3 of them.
 I didn't hack this one, but I've hacked the other two!  
They will show up in a later blog post.
This fabric is a ribbed knit that I purchased last year for a totally different project.  When I decided to make this top, I knew I had to pre-wash the fabric, because 100% cotton ribbed knits usually shrink like crazy.  This one did not shrink, but it turned from off-white to this buttery yellow.
I love the "new" color!


Simplicity 1108

Yes!  I made it again!  This time I used a very sheer sweater knit that I've had in my stash for many years...mainly because I couldn't decide what to do with it!  I finally reminded my self that "it's just fabric"!

It was much too sheer to support the band that the pattern called for and it would not have supported any interfacing.  So I decided to try some fleece binding! It worked beautifully!  
I love how airy it is and that it can be dressed up or down with a dress or jeans or skinny jeans.


Simplicity 8553

The striped ribbed knit fabric was gifted to me...and I loved how it matched the solid ponte from my stash! I hacked the shape of sleeves a bit.  And yes, it has pockets! I have not yet worn it, but it will easily work with a dress, skirt or jeans!


Simplicity 8377

Again!  
I love how versatile this patterns is!  This is another "make to travel" piece.  And my new bias binding addiction is evident! But I sew loved how it turned out in this active-wear knit, that I could not bring myself to wear it on the plane!  It was just too nice to put it through the hassle of the airport or plane.  
Sew!  
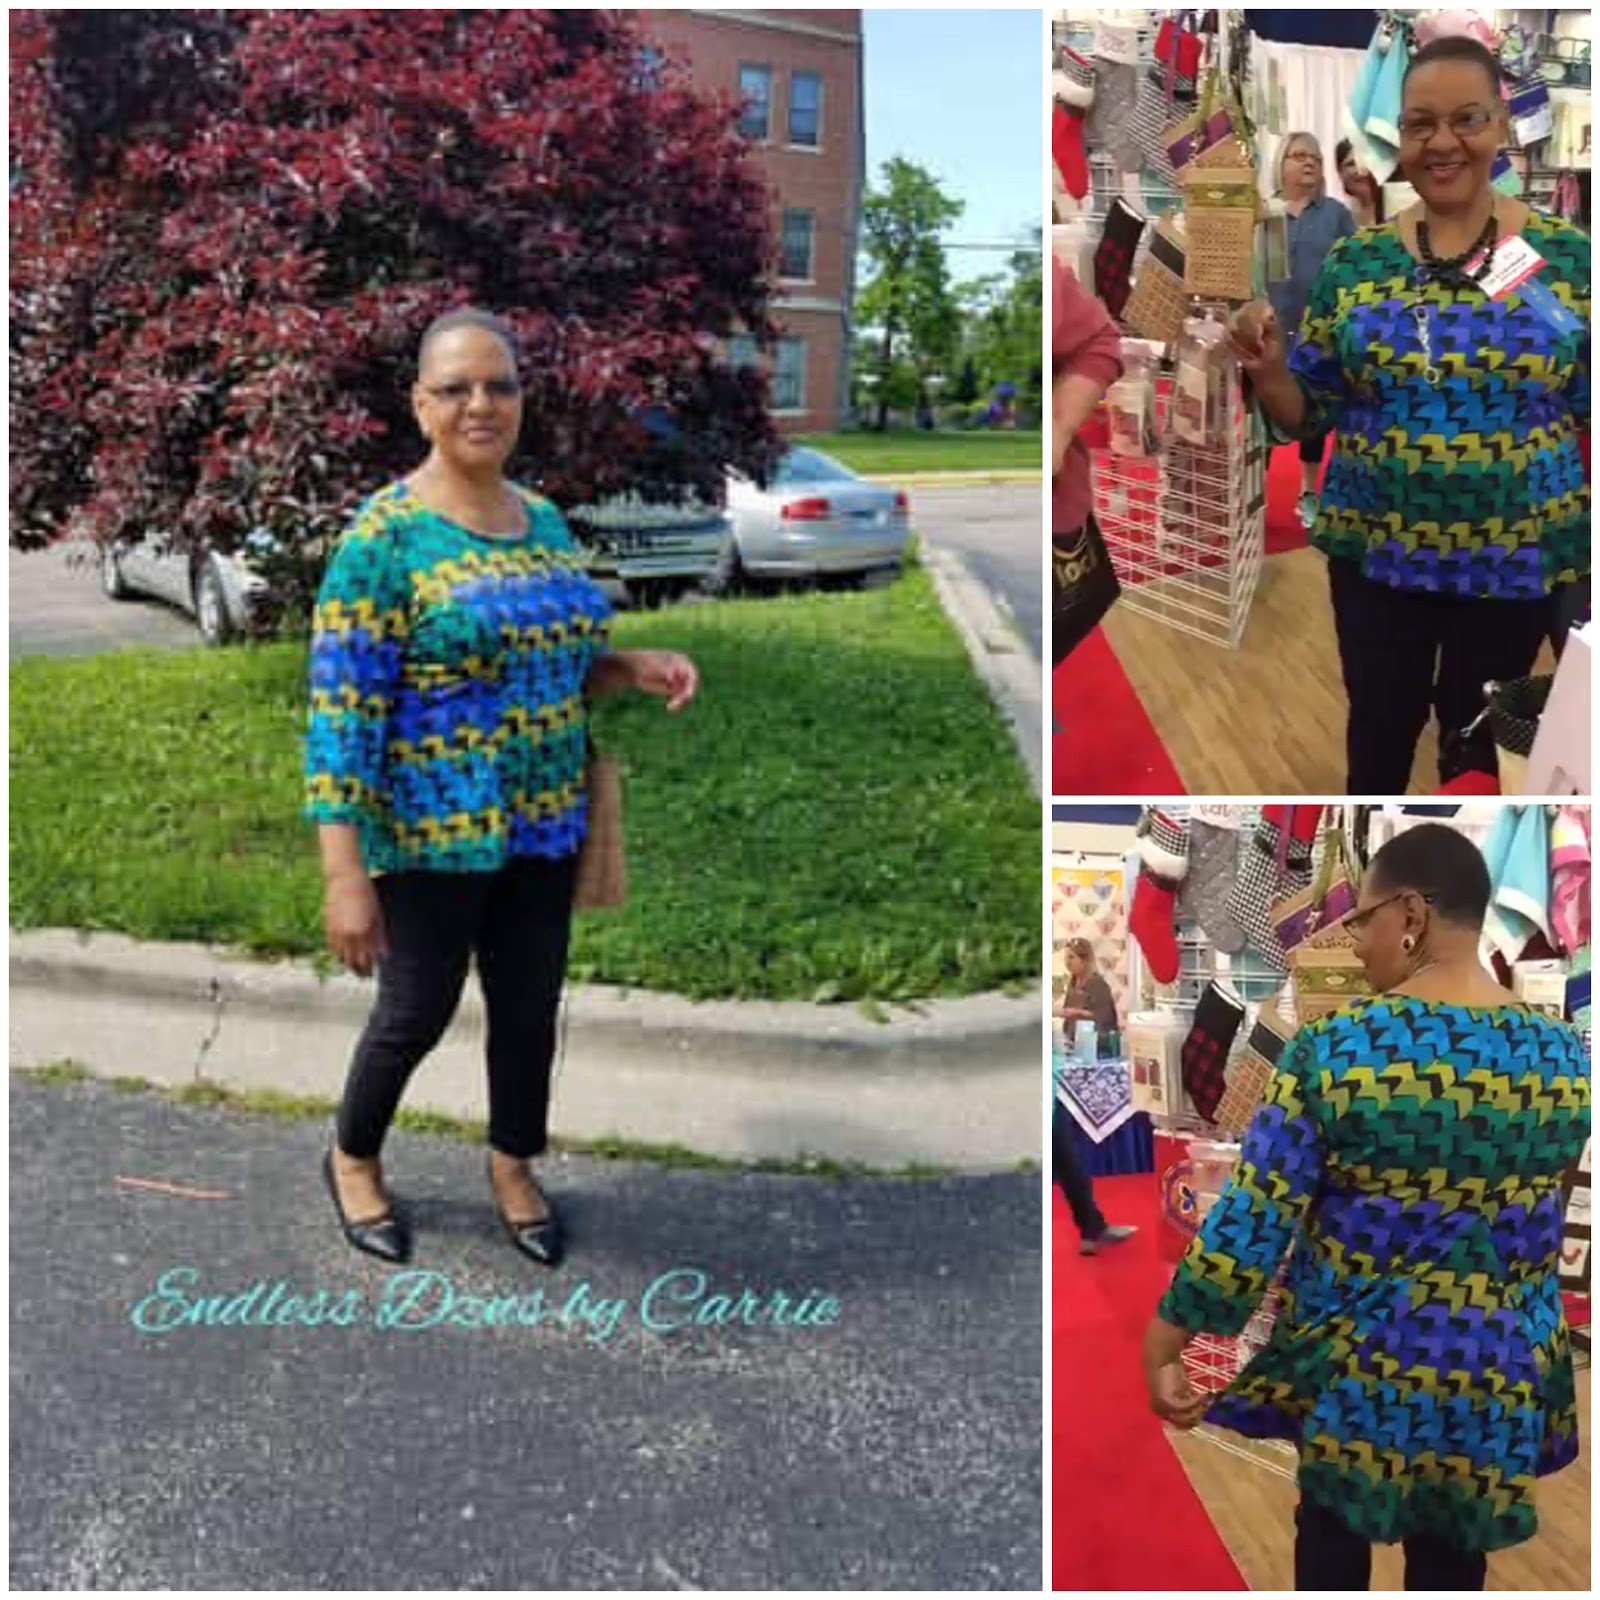
It went to the Houston International Quilt Fest in my luggage!
  LOL! 
I'm happily wearing it on the last day fest in the bottom photo! 


 Simplicity 8377

  Last, but definitely not least!  
This is a peach skin fabric from my stash from the long gone Hancock's Fabric!  This print required print matching...I'm very happy with the outcome! And yes...more bias binding...this one was navy!  I chose to hack the sleeves to make them more of a kimono style.
 All those colors on top of the navy base makes this a fun piece to wear!


I've worn it at least 5 times since I made it...including on Grandparents' Day and to a meet up with my friend Sandy!

Are you planning to participate in any sewing/crafting challenges this year?
Let me know by commenting below!


Happy Endless Sewing!


Don't want to miss a blog post? Sign up for email notices.


Tuesday, September 11, 2018

My Sheer Duster - Last Make of the Summer!

This post may contain affiliate links. This means that if you click through and make a purchase from these links, I may earn a small commission at no extra cost to you.

Chiffon Border Print Duster

This was yet another fabric piece that was initially destined to be scarves, but once I got on the "duster and kimono route" I kept at it when I found this in my stash!  

It is a lovely chiffon border print.  If you didn't know already, I LOVE border prints.  
I have a pretty large stash of them! 

I really love this one - I think it's my favorite! It literally floats! Sew fun to wear!


I used the same self-drafted pattern that I used for the "Bright and Colorful Duster" that was posted a few weeks ago. Then I added side splits! Oh yes!

Check out those long side splits! Sew fun!


I've styled it several ways. Here it is with skinny jeans and heels.


The seams were done with French seams.


Of course I had to do some print matching - which I love doing! 💓


The edges were bound with 1/4" double folded bias binding.  It was the perfect binding weight - it allowed the duster to retain it's airiness!


Then I switched to cropped pants and heels!


Of course I couldn't leave out my yellow dress! LOL! 
I really love this bright yellow under this sheer fabric!


I also really like the look of it with my tent/swing/trapeze Pinterst Interest Winner dress!


It's not fall yet, right? 

We are expecting temperatures in the high 80s this weekend. 
So I'll wear it then -  and put it away until next spring! 

Have you started your Fall sewing?  I have one jacket started. I always seem to be sewing during each season vs. prior to each one. But there are no rules, right? LOL

My virtual sewing classes will begin on September 24, 2018!
Registration is still open! Class size is unlimited! 
Click here for more information and to register!

I welcome your comments and questions and invite you to visit often for sewing tips and tricks!

Happy Endless Sewing!

Online Class Registration

Join my Facebook Group


Don't want to miss a blog post? Sign up for email notices.


Carrie Cunningham is a participant in the Amazon Services LLC Associates Program, an affiliate advertising program designed to provide a means for sites to earn advertising fees by advertising and linking to Amazon.com.


Let's Make and Wear a Kaftan

This post may contain affiliate links. This means that if you click through and make a purchase from these links, I may earn a small commiss...