Saturday, August 10, 2019

Chiffon Duster Re-Fashion


This post may contain affiliate links. This means that if you click through and make a purchase from these links, I may earn a small commission at no extra cost to you.

Chiffon Duster Re-Fashion

I purchased this chiffon print to make a duster.

Keep reading to see how and why I re-fashioned it!


Then I read about the @Sewcialists Mini Challenge.
Yes! I still love sewing challenges! 😍
  We had 4 days to complete the challenge.  The only requirement was that it contained one of the colors of their logo.

We went to their blog to spin the "color wheel".  The color you landed on was to be present in whatever you made. I happened to land on coral, but it happened to be the only exception.
We could use RED instead!
With that spin, I was all in!


So I pulled out my fabric (which happened to have all of the allowed colors) and made this self-drafted duster! I posted it on Instagram with the hashtag #sewcialists just in the nick of time!
I love the shirt-tail hemline.  
But...after it hung around a few days, I realized it needed more structure and that I probably wouldn't wear it as it was.  I was not 100% happy with it.


I really couldn't decide how I'd "fix" it...until this new #alteritaugust challenge hosted by @sewnorth surfaced!
And...the "fix" also fits the Sew Much Talent Facebook group August Re-fashion and Alteration Challenge!  
I love it when I can sew one garment that works for more than one challenge! 😉


I looked through my stash for this RED linen blend that I've had for much too long.


It was as perfect a match as I thought it would be! It was also the perfect weight for my re-fashion plan.


Ummm...I forgot to finish the edges before I washed it! But all was well!


I had to put some thought into how I wanted to add the RED front and sleeve bands to my duster.  Did I want to unpick the narrow hems (Which would take forever) or did I want to cut the hem off? 
My rotary cutter and I decided to cut it off very carefully.  


I chose not to interface the bands, because I was already happy with the weight of the fabric.  
I sewed the new front and sleeve bands on, then serged the seam allowance.


 Tada!
 I now have a new and improved duster that I am 1000% happy with and love to wear!
It is no longer flimsy and inexpensive looking!


The center back originally had gathers at the neckline.  When I refashioned it, I decided that those gathers should be changed to an inverted pleat. 
Sew Much Better!


I'm thinking my favorite black dress would look great with it!  
But my leggings and skinny jeans look great, too! 


I love what the weight of the linen did to this duster.  
It gave it structure - which allows it to hang well when I'm moving!


I love the air and flow this gets! 


I believe I can fly! 


😎


                                                   What you altering or refashioning?


Photo Cred: @karbearbozeman

Happy Endless Sewing!


Don't want to miss a blog post? Sign up for email notices.


Tuesday, August 6, 2019

Wrap Pants - Camo Style

This post may contain affiliate links. This means that if you click through and make a purchase from these links, I may earn a small commission at no extra cost to you.

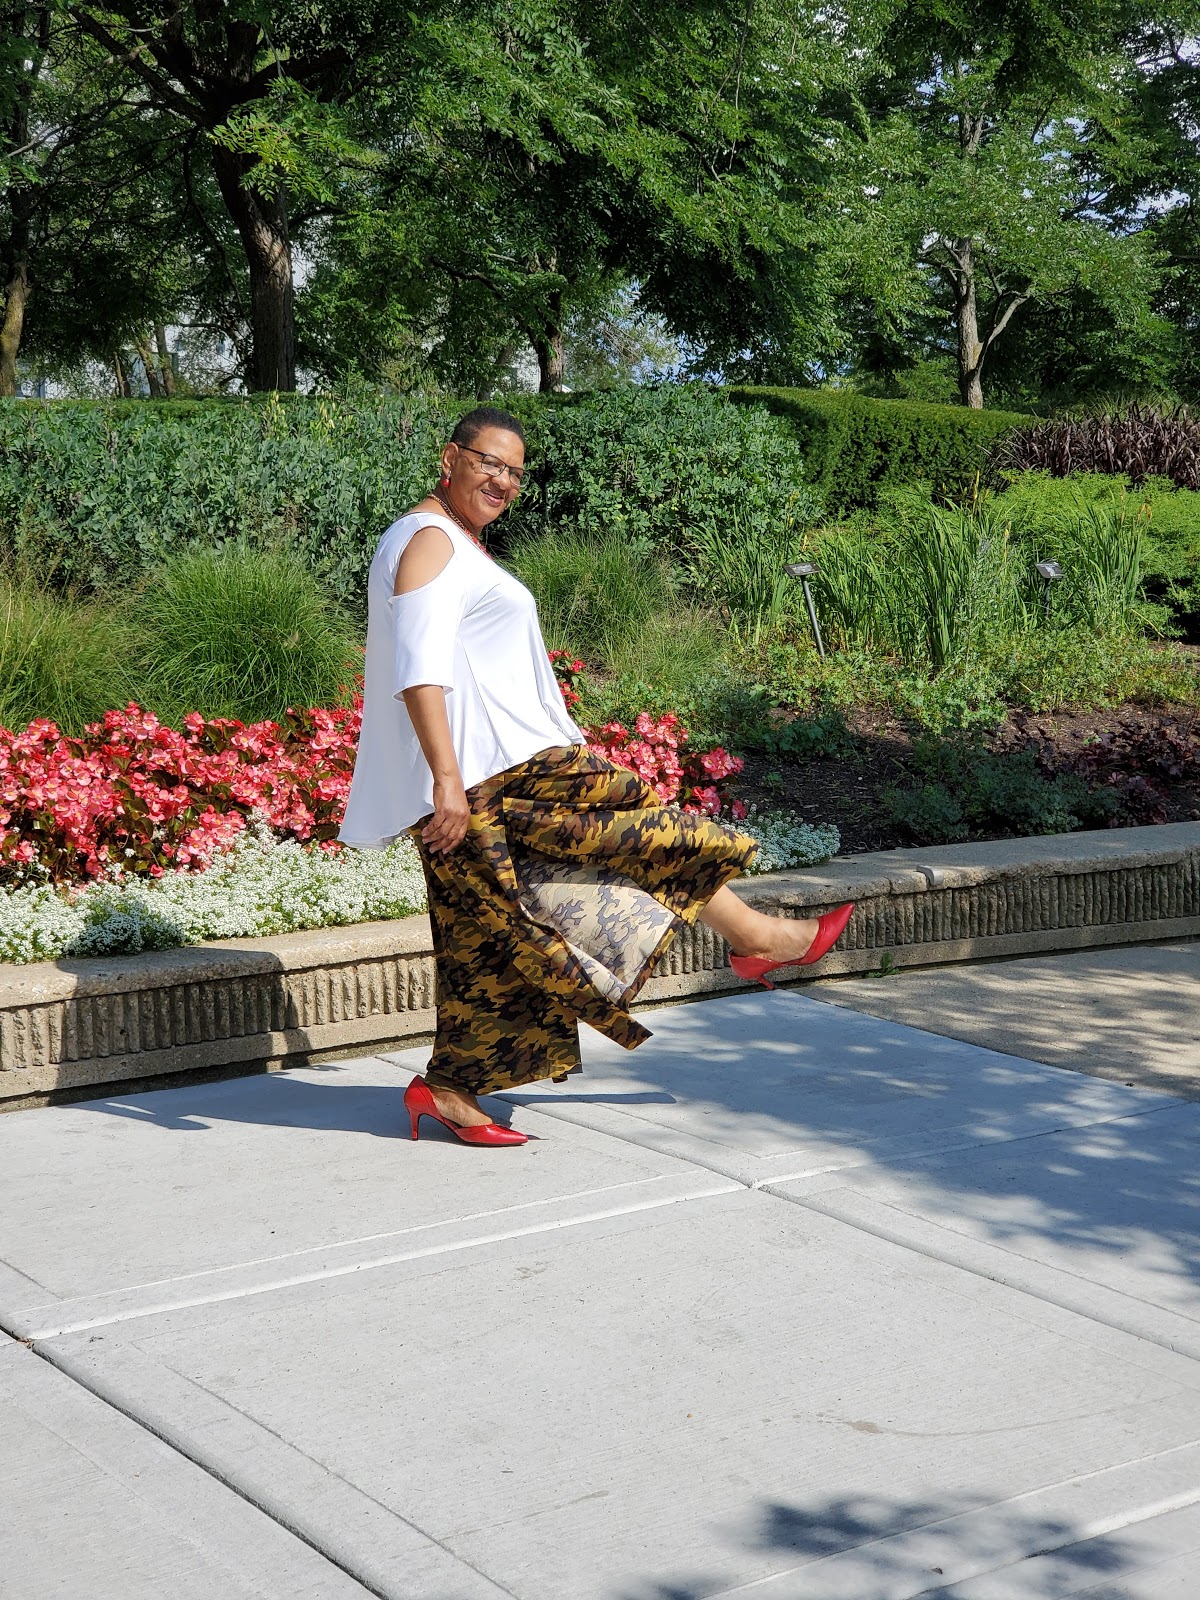
These camo print wrap pants - yes pants - were sew much fun to make
and even more fun to wear! 

They feel like a maxi skirt and secret pajamas all at once!

I'm in love!

💓💓💓


And I love it with my self drafted cold-shoulder hi/low top!

y

There are many video tutorials out there for these wrap pants. 
But, I chose the You Tube tutorial by my sewsister, Tree - of Stiitchless TV. 
Click here for her video.

 These pants are truly zero waste! Your scraps become the ties!


To wear them you tie the front 1st, then pull up the back and tie again.  
Of course you can use buttons, snaps or even hook and loop tape to fasten your pants, but for those times we need a bit more room in the waist, believe me - ties are better! 


There is only one seam - the crotch seam - just one!  
Of course I used my serger on this lightweight knit fabric.
Chiffons, challis, linen blends, cotton, rayon and medium weight knits will work as well.

The sides and bottom only need a narrow hem.  I'd suggest that you hem the bottom 1st (as Tree discovered).

I had to put my label in as soon as I stitched the crotch seam, because I didn't use notches yikes). 

And even though my front crotch is smaller than my back crotch (go figure) I would not have known the front from the back once they were stitched together!  LOL!


Once the bottom and sides were hemmed, I added the waistband - which included the ties.  I pressed the band in half lengthwise - to prevent crazy shifting.
I centered the waistband on the front and stitched it from side to side. 
I then sewed the ties from one side to the other, turning under as I sewed. 
I repeated the same steps for the back.


I made a cotton muslin (woven) first.  
As suspected, it opened on the side from the hip down when I walked.
Flashing is not good!  Hahahaha!

But the lightweight knit worked sew much better - the sides only opened from just below my knee.
No flashing, right! Yay!


I love how it flows and how the wind picked it up and how comfy it is!  
I was thinking to buy more of this fabric and make a maxi skirt, but these pants also fit the skirt bill!  

Did I say that I'm in love with it!
💓


💓💓💓


Photo Cred:
Kari Bozeman
@karebearbozeman


Happy Endless Sewing!


Don't want to miss a blog post? Sign up for email notices.


Monday, July 22, 2019

Beaded Street Wear

This post may contain affiliate links. This means that if you click through and make a purchase from these links, I may earn a small commission at no extra cost to you.

My Daughter Was At It Again!
  
"Mommy, can you make this for me?" 
Gotta love it!
Of course I can!


I searched and searched for beaded black tulle and finally found it online at Mood Fabrics.  
I was ecstatic to find it...but then I'm always ecstatic to find the perfect fabric for any project. 😃 
I love the quality of this...very soft and it has a great drape!


The beads may look symmetrical, but they are not! The good news is that I only lost a few of them when I squared up the fabric...we all know how those cuts can be a bit crooked!


I didn't use pins or scissors...just my DYI fabric weights and my rotary cutter with a fresh blade!  I cut the back just a bit longer...to prevent a raised back hem.


I made a basket full of fabric weights quite a while ago.
I purchased metal washers from Home Depot and wrapped 2 each in a square of cotton fabric, then tied it with ponytail holders!


I used my zipper foot to sew it. Glad I though of that! 

Don't forget to check out my Online Presser Feet Class
They can be used in sew many applications!

While sewing I only had to remove 1 bead.  They come off with a very slight twist!
 Whew!


I made the waist casing for the 1/2" wide elastic with 5/8" grosgrain ribbon.

I always try to work "in the flat" as much as I can with any garment and this was no exception.  
So I finished the skirt with just one center back seam - after the elastic was inserted.


Street wear is not for everyone, nor is  it for the faint of heart, but she wore it well!


Happy Endless Sewing!


Don't want to miss a blog post? Sign up for email notices.

Saturday, June 15, 2019

One Pattern 2 Ways

This post may contain affiliate links. This means that if you click through and make a purchase from these links, I may earn a small commission at no extra cost to you.

I AM IN LOVE!  


I've had this McCall's 7348  pattern for a few years, but recently pulled it out when I decided I wanted a quick make for Mother's Day.  
Yes! I made it the night before!  

Why do we do this to ourselves?  This time my excuse is that I was buried in Prom and Graduation makes!

But, I'm so glad I decided to make it at the last minute!
Why? 
Because I didn't have time to go through ALL of my stash to find a piece large enough in a color I wanted to wear.  I knew I had 6 yards of this coral ITY knit that I purchased years ago from the warehouse we affectionately call "2121".


I made view D with the sleeves from view C. 
It came together very quickly! 
I did not need to make any measurement adjustments at all!  
That is an anomaly - as I usually have to make fit adjustments on commercial patterns!

I did all of the construction on my serger.  I didn't have thread in this beautiful coral color, so I did what I normally would do...I blended a few colors to make it work!


Before I added the sleeves, I got out my heels and tried it on!  

I WAS IMMEDIATELY IN LOVE!

I walked around in it about 10 minutes!  

Yes! There is absolute joy in sewing for yourself!
  This was one of those moments!  I loved the fit, the flow, the drape and how it made me feel!


I added and hemmed the sleeves finished the neckline. 
But my serger decided it did not want to do a narrow hem, and I needed to get some sleep, I decided to leave the bottom raw.  
I cleaned up my slightly imperfect scissor cuts with my rotary cutter and I was done! This was my first time doing a raw hem.  I'm still not sure how I feel about it!  Time (and fabric type) will tell if I do it again.


This top/dress even looks good on the hanger! 😍 Look at that drape!


SEW!
I made it again! 

I bought this beautiful ITY from Vogue Fabrics earlier in the spring. When I saw it, I had no idea what I'd do with it, but after making the coral piece, I knew it would work for the pattern...and for another special occasion...my Grandheart's Graduation!


I laid it on my cutting table to take a look at the direction and area of the print, because I knew I'd have to "mirror" the pattern to insure the print matched.

I laid out and cut the back piece 1st.  When I attempted to lay out the front piece, I realized I did not have enough fabric to use in the same direction as the back.

Sew, I flipped the direction of the front pattern piece. After moving it around a few times, I decided that I wanted the smaller print at my neckline and the solid black at my waist.


Again, when I tried in on, I was in love with the outcome!

I really love how this print drapes on my body!
  Sexy!  I can say that, right? 

Again I used my serger (4 thread set up) to construct this one.


Of course, things don't always go as planned when making garments.  
But I'm happy that this time it only running out of thread on the spool of thread I was using to hem it.  I only needed about 3 more inches of stitches to finish it.  Sew out came a new spool and I finished it!
No raw edges on this one!


I narrow hemmed it with the lighting bolt/wobble stitch which stretches with the garment...no future popped stitches!

Finished the neckline and added my label!


I am happy and proud to say that my dress/top was featured by
 Judith Rosalind of the Instagram @sewover50 hashtag...which has over 12, 000 followers! 
This was quite the surprise and an honor!


I actually don't know which I like better, the back or the front!  I do know that I love the way I look and feel when I wear it!


And...I've taken a few orders for it!  Of course not in the same fabric!  LOL!


Sew!

I am definitely making another one! 

How often have you used the same pattern to create a new look by simply switching up the print and/or fabric?

Happy Endless Sewing!


Don't want to miss a blog post? Sign up for email notices.  


Let's Make and Wear a Kaftan

This post may contain affiliate links. This means that if you click through and make a purchase from these links, I may earn a small commiss...